
This guide offers a creative DIY project using mini building blocks to craft a charming black bear․ Follow step-by-step instructions to assemble a detailed, miniature bear model․ Perfect for enthusiasts of all skill levels, this project combines fun and learning, bringing a symbol of nature into your hands․
Overview of Mini Building Blocks and Black Bear Models
Mini building blocks are versatile tools for creating intricate models, offering endless creative possibilities․ A black bear model, crafted with these blocks, allows enthusiasts to bring wildlife into miniature form․ These models often feature detailed designs, capturing the bear’s natural appearance and movements․ Building such models fosters creativity, patience, and attention to detail․ The process of assembling a black bear from small blocks mirrors the real-life behavior of bears, which are known for their adaptability and resourcefulness․ This project is perfect for both beginners and experienced builders, providing a rewarding experience that combines art and nature․ The finished model serves as a charming reminder of the beauty found in the natural world․
Importance of Following Instructions for DIY Projects
Following instructions in DIY projects is crucial for achieving desired results․ Clear guidelines ensure each part aligns correctly, preventing errors and saving time․ For mini building blocks, precise steps help maintain structural integrity and visual appeal․ Skipping details can lead to instability or misalignment, affecting the final model’s quality․ Instructions also enhance safety, especially when handling small parts or tools․ By adhering to them, builders can enjoy a seamless and rewarding experience, turning a pile of blocks into a charming black bear․ This systematic approach fosters creativity while teaching essential problem-solving skills, making the DIY journey both educational and enjoyable․


Gathering Materials and Tools
Collect all mini building blocks, including paws, body parts, and accessories․ Ensure necessary tools like tweezers, a small hammer, and a workbench are ready for assembly․
Essential Components for the Black Bear Model
To build the black bear model, you’ll need specific mini building blocks․ These include the base plate, body segments, limb pieces, and detailed parts like eyes and a nose․ Additional components such as small connectors and joints ensure the bear’s structure is stable․ Ensure all pieces are compatible and match the model’s design specifications․ Organize them by shape and size to streamline the assembly process․ Having all components ready beforehand prevents delays and ensures a smooth building experience․
Recommended Tools for Assembly
For assembling the mini black bear model, several tools are recommended to ensure precision and ease․ A pair of tweezers is essential for handling small blocks and fitting them into tight spaces․ A small, flathead screwdriver can help tighten loose connections or adjust pieces․ A clean, flat work surface is crucial for organizing and assembling parts․ A magnifying glass or lamp can provide better visibility for intricate details․ Additionally, a sorting tray or container can keep components organized and within reach․ A soft, dry brush may be useful for removing dust or debris from the pieces․ Finally, a ruler or measuring tool can help align parts accurately․ These tools will enhance your building experience and ensure a sturdy, well-crafted model;
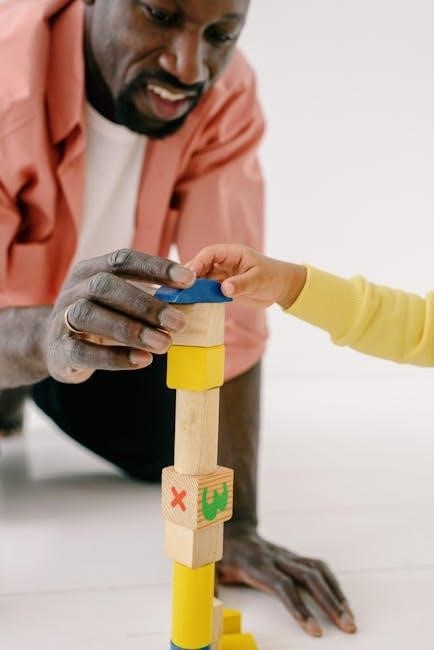
Step-by-Step Assembly Guide
Begin by carefully following each step to construct the base, body, and limbs․ Use the provided instructions to ensure accuracy and proper alignment of all parts․
Preparing the Base Structure
Start by constructing the base structure, which serves as the foundation of your black bear model․ Using a flat surface, arrange the larger blocks to form a stable platform․ Ensure each block is securely connected to create a solid base․ This step is crucial as it provides the stability needed for the entire model․ Once the base is complete, you can proceed to build upwards, adding layers that will form the bear’s body․ Make sure all connections are tight to prevent the structure from shifting during assembly․ A sturdy base ensures the final model stands upright and remains balanced․
Building the Body and Limbs
After securing the base, attach the limb components to the base structure using connector blocks․ Ensure each limb is aligned symmetrically for balance․ Next, stack blocks to form the torso, chest, and back, maintaining the bear’s natural posture․ Use curved or angled blocks to shape the shoulders and hips․ Add smaller blocks to define the paws and claws, ensuring they are proportional to the body․ For movement, incorporate joint blocks between the limbs and torso․ Continue layering blocks to build muscle definition, ensuring the shape remains cohesive․ Pay attention to symmetry and balance to maintain the bear’s stability․ This step lays the foundation for the bear’s form before adding final details․
Adding Details and Final Touches
Once the body and limbs are assembled, focus on refining the bear’s features․ Use small blocks to create facial details, such as eyes and a nose, ensuring they are proportionate․ Add texture to the fur by layering tiny blocks in varying directions․ Attach accessory pieces like ears and a snout, aligning them carefully․ Smooth out any uneven edges using a file or sandpaper for a polished look․ Paint or color individual blocks to enhance realism, such as adding shading or a muzzle․ Finally, inspect the model for balance and stability, making minor adjustments as needed․ These final touches transform the bear into a lifelike, personalized creation, ready for display or gifting․
Tips for Customization and Accuracy
Enhance your black bear model by experimenting with color variations or unique designs․ Use reference images for precision and ensure symmetrical alignment of blocks for a polished finish․
Enhancing the Bear’s Appearance
To make your mini black bear model stand out, consider adding small details like textured fur using varied block colors or patterns․ Use a fine paintbrush to paint on facial features or claws for realism․ Experiment with accessories, such as tiny beads for eyes or a small block for a nose, to create a more lifelike appearance․ For added personality, customize the bear’s pose by adjusting limb positions or adding a small prop like a fish or honeycomb․ Reference real black bear images to ensure accuracy in shape and color․ Keep it simple or go creative—every small touch enhances the final result and makes your model unique․
Common Mistakes to Avoid
When assembling the mini black bear model, avoid rushing through the instructions, as this can lead to misaligned blocks and structural instability․ A common error is forcing pieces together, which may damage the blocks or the model․ Ensure all parts are properly aligned before securing them․ Neglecting to prepare materials in advance can disrupt the workflow․ Additionally, failing to follow the sequence of steps may result in incorrect assembly․ Avoid using excessive force, as it can strip the blocks’ studs․ Pay attention to color accuracy to maintain the bear’s realistic appearance․ Lastly, skipping small details can compromise the model’s overall aesthetic․ Patience and attention to detail are key to achieving a polished result․

Safety Precautions and Storage
Handle small parts with care to avoid choking hazards․ Store completed models in a dry, secure location to maintain their condition and prevent damage over time․
Handling Small Parts Safely

When working with mini building blocks, always handle small parts with care to avoid accidents․ Keep them out of reach of young children to prevent choking hazards․ Ensure a clean, stable workspace to minimize the risk of losing or misplacing components․ Wear protective eyewear if you have sensitive eyes, as small pieces may accidentally fly during assembly․ Avoid touching sharp edges or points on the blocks, as they may cause minor injuries․ Store unused parts in sealed containers to maintain organization and safety․ Supervise children during assembly to ensure they follow safety guidelines․ By taking these precautions, you can enjoy a safe and enjoyable building experience․

Proper Storage of Completed Models
To maintain the integrity of your finished black bear model, proper storage is essential․ Place the model in a sturdy, dust-proof container to protect it from environmental damage․ Avoid exposing it to direct sunlight, as this may cause color fading over time․ Store it in a cool, dry place away from moisture to prevent warping or damage․ If the model has movable parts, secure them gently to avoid dislodgment․ Consider using acid-free tissue paper or soft cloth to cushion the model within the container․ Label the storage box clearly for easy identification․ By following these steps, your mini black bear will remain in pristine condition for years to come․
Building a mini black bear with blocks is a rewarding DIY project that combines creativity and skill․ It’s an excellent way to relax and express your artistic side while creating a charming keepsake․ The process not only enhances fine motor skills but also fosters patience and attention to detail․ Whether you’re a seasoned builder or a beginner, this project offers a sense of accomplishment and joy․ With proper care and storage, your mini black bear will remain a delightful reminder of your creativity for years to come․
Final Thoughts on Building the Mini Black Bear
Completing the mini black bear model is a fulfilling experience that showcases your creativity and dedication․ This project is ideal for both beginners and experienced crafters, offering a sense of accomplishment and pride in your handiwork․ The detailed instructions guide you through each step, ensuring a polished final product․ By following the provided steps carefully, you can create a charming and intricate black bear that reflects your personal style․ This small project is a great way to unwind and express your artistic side, resulting in a delightful keepsake that can be treasured for years․

Encouragement for Future DIY Projects

Embarking on the mini black bear project is just the beginning of your DIY journey․ The skills and confidence gained from this experience can inspire you to explore more creative ventures․ DIY projects offer a rewarding way to learn new techniques, relax, and produce meaningful results․ Consider experimenting with other mini models or crafting unique items for your home․ Each project builds upon the last, fostering creativity and problem-solving abilities․ With patience and practice, you can tackle increasingly complex designs, turning your ideas into reality․ Embrace the joy of creation and continue discovering the satisfaction of making something with your own hands․