This manual provides a comprehensive guide for installing, operating, and maintaining Sterling unit heaters. It ensures safe and efficient use, covering key features, installation steps, and essential safety precautions. Always read it carefully before proceeding with any setup or operation to avoid potential risks and ensure optimal performance.
1.1 Importance of Reading the Manual
Reading the Sterling Unit Heater manual is crucial for safe and efficient operation. It provides detailed instructions for installation, maintenance, and troubleshooting, ensuring compliance with safety standards. Proper understanding of the manual prevents potential hazards, such as gas leaks or electrical issues. It also helps users optimize heater performance, reducing energy costs and extending lifespan. The manual includes essential warnings and precautions, emphasizing the importance of following specific guidelines. By adhering to the instructions, users can avoid costly repairs and ensure reliable heating. Always retain the manual for future reference, as it serves as a valuable resource for ongoing operation and maintenance.
1.2 Key Features of Sterling Unit Heaters
Sterling unit heaters are known for their high efficiency and durability. They feature advanced tubular heat exchanger technology and a single-orifice burner system, ensuring superior performance. These heaters are designed for versatility, suitable for residential, commercial, and industrial settings. They offer low-profile designs, making them ideal for garage and outdoor applications. Sterling heaters are ETL certified, meeting stringent safety standards. They also come with user-friendly controls and thermostat compatibility, allowing precise temperature management. Additionally, they are configured to burn natural gas, with options for LP conversion by qualified professionals. Their robust construction and innovative engineering make them a reliable choice for consistent and efficient heating solutions.

Installation Guidelines
Proper support and secure installation are crucial to prevent damage and injury. Ensure all connections are correct to avoid issues and always follow the manual’s instructions carefully.
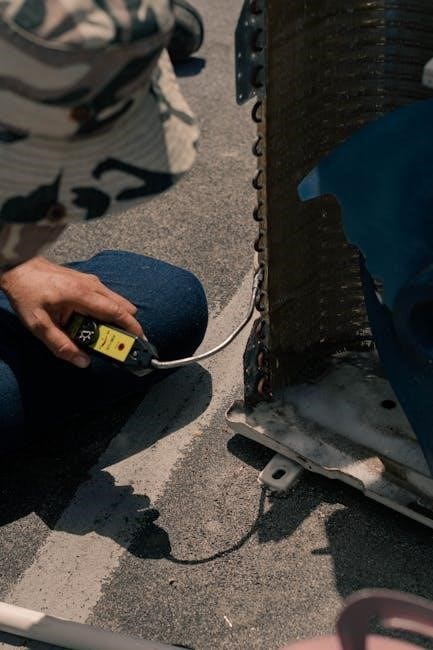
2.1 Pre-Installation Checks
Before installation, ensure the Sterling unit heater is compatible with your setup. Verify gas type (natural or LP) and confirm the unit is configured accordingly. Check electrical requirements to match your power supply. Ensure proper venting materials and connections are available. Inspect the installation location for Clearance from combustible materials. Verify that all components, such as the thermostat and gas valve, are included and undamaged. Ensure the heater is properly supported to handle its weight. Review local building codes and regulations. Proper preparation ensures a safe and efficient installation process. Always refer to the manual for specific instructions and guidelines.
2.2 Step-by-Step Installation Process
Mount the Sterling unit heater securely, ensuring it is level and properly supported; Connect the gas line, making sure all fittings are tight and leak-tested. Open the manual gas valve on the heater. Restore electrical power and ensure the thermostat is set to operate the heater. Connect the venting system according to the manufacturer’s instructions, ensuring proper clearance and material compliance. Install the thermostat, following the wiring diagram provided. Test the heater by turning the thermostat to the desired temperature and verifying proper operation. Double-check all connections for leaks or loose fittings. Ensure all safety guidelines are followed for a secure and efficient setup.
Operating the Sterling Unit Heater
Open the manual valve, restore power, and ensure the unit is thermostat-controlled. Set the thermostat to desired temperature and monitor operation for smooth, efficient heating performance.
3.1 Starting Up the Heater
Starting up the Sterling unit heater involves a few straightforward steps. First, ensure the manual valve is fully open to allow gas flow. Next, restore electrical power to the unit. The heater should now be under the control of the thermostat. Set the thermostat to the desired temperature to activate the heating cycle. It is essential to follow the manufacturer’s instructions carefully to ensure safe and efficient operation. Always refer to the manual for specific startup procedures and guidelines tailored to your unit. Proper startup ensures optimal performance and longevity of the heater. Retain the manual for future reference and troubleshooting.
3.2 Understanding Thermostat Control
The thermostat plays a crucial role in regulating the Sterling unit heater’s operation. Once the heater is properly installed and powered, the thermostat takes control, turning the unit on and off to maintain the set temperature. Ensure the thermostat is compatible with your heater model for accurate control. Adjust the thermostat settings according to your comfort needs, and refer to the manual for specific instructions on programming or adjusting sensitivity. Proper thermostat operation ensures efficient heating and energy savings. Always consult the manual for troubleshooting thermostat-related issues or for guidance on optimizing temperature control. This ensures consistent performance and comfort in your space. Retain the manual for reference.

Maintenance and Service
Regular maintenance ensures optimal performance and safety of the Sterling unit heater. Inspect filters, check gas connections, and ensure proper ventilation. Troubleshoot common issues promptly for efficiency and reliability.
4.1 Routine Maintenance Tasks
Performing routine maintenance on your Sterling unit heater is essential for optimal performance and safety. Start by inspecting and cleaning the air filters to ensure proper airflow. Next, check the gas connections for any leaks and tighten them if necessary. Insulate the unit to prevent heat loss and improve efficiency. Additionally, examine the heat exchanger for signs of damage or corrosion, and clean it if needed. Replace any worn-out parts promptly to avoid system failure. Finally, ensure that the ventilation system is functioning correctly to remove combustion byproducts. Regular maintenance helps extend the lifespan of your heater and ensures reliable operation.
4.2 Troubleshooting Common Issues
Encounter issues with your Sterling unit heater? Start by ensuring the power supply is stable and the thermostat is set correctly. If the heater doesn’t ignite, check the gas valve and pilot light. Inspect for blockages in the venting system, as improper ventilation can cause shutdowns. If the unit overheats, inspect the heat exchanger for damage or obstructions. For inconsistent heating, verify proper gas pressure and airflow. Always refer to the manual for specific troubleshooting steps. If problems persist, contact a certified technician to avoid safety risks. Regular maintenance can prevent many of these issues, ensuring reliable operation and longevity.
Safety Precautions
Follow all safety guidelines in this manual to ensure proper installation and operation. Ensure gas connections are secure, the unit is properly secured, and flammable materials are kept away. Always have a professional assist with LP conversions to maintain safety standards.
5.1 General Safety Guidelines
Always read the manual thoroughly before installation or operation. Ensure all gas connections are securely made and tested by a qualified professional to prevent leaks. Keep flammable materials away from the unit and ensure proper ventilation in the room. Regularly inspect the heater for damage or wear, and address any issues promptly. Follow all local safety regulations and manufacturer recommendations. Never attempt to service the unit without turning off the power and gas supply. Properly secure the heater to prevent any movement or instability, ensuring it is mounted according to the installation instructions provided.
5.2 Emergency Shutdown Procedures
In case of an emergency, immediately turn off the electrical power and gas supply to the unit. Ensure the area is well-ventilated and evacuate if necessary. Do not attempt to restart the heater until a qualified professional has inspected and cleared it for operation; If you detect a gas leak, open windows and avoid any ignition sources. Keep a fire extinguisher nearby and contact emergency services if the situation escalates. Always follow the manufacturer’s instructions and local safety regulations for emergency situations. Ensure the unit is cool before any servicing or maintenance is performed.
Technical Specifications
Sterling unit heaters feature advanced tubular heat exchangers and single-orifice burner systems for superior durability. Models are ETL certified and configurable for natural gas or LP operation;
6.1 Heater Configuration and Compatibility
Sterling unit heaters are designed for versatility, supporting both natural gas and LP configurations with proper conversion. They are suitable for residential, commercial, and industrial settings, offering low-profile designs for space efficiency. Compatibility extends to various installation types, including wall-mounted and suspended units. Ensure all configurations meet local regulations and safety standards. Proper installation by qualified professionals is crucial to maintain efficiency and safety. The heaters are ETL certified, ensuring reliability and adherence to industry standards. Always refer to the manual for specific configuration details and compatibility guidelines for optimal performance and compliance.

Warranty and Support
Sterling HVAC offers a comprehensive warranty program, ensuring coverage for parts and labor under specified conditions. Dedicated customer support is available through their website and regional offices.
7.1 Warranty Information
Sterling HVAC provides a comprehensive warranty program for their unit heaters, ensuring coverage for parts and labor under specific conditions. The warranty period varies depending on the model and installation type, with detailed terms outlined in the manual. Proper installation and maintenance are required to maintain warranty validity. The unit must be registered with Sterling HVAC to activate the warranty benefits. Customers should review the warranty section carefully to understand coverage limits and exclusions. Any repairs or replacements must be authorized by Sterling HVAC to ensure compliance with warranty terms. This ensures customers receive optimal support and protection for their investment.
7.2 Contacting Sterling HVAC Support
For any inquiries or assistance, Sterling HVAC Support is available to provide professional help. Customers can contact Sterling HVAC through their official website at www.sterlinghvac.com or by visiting their office at 260 North Elm St., Westfield, MA 01085. Ensure to have the model and serial number of your unit heater ready when reaching out for support. This information is crucial for efficient troubleshooting and service. Sterling HVAC representatives are trained to address installation, operation, and maintenance-related questions, ensuring a smooth experience for all users.